Sundog has now been sold.
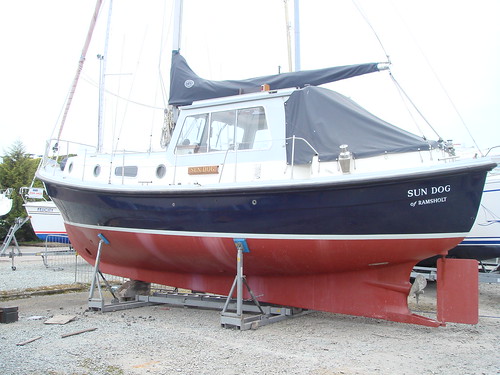
We came across this Rogger 35 MK2 “Sun Dog of Ramsholt” for sale in Ipswich (2007) and she looked like she would be an eminently suitable boat for the West of Scotland, where, let’s face it, it has been known to be a wee bit cold and also rain a little 😉 After checking her out with a surveyor, and getting a good report we had a short sea trial and closed the deal. Then with the help of my mate Marcus we sailed her up to Scotland.
The decison to buy her has proven to be a good one, because whilst she will never win races, she is without doubt a really practical and safe boat, well suited to our climate in the northern hemisphere and meets our requirements for a safe comfortable and secure family boat to sail the West Coast of Scotland.
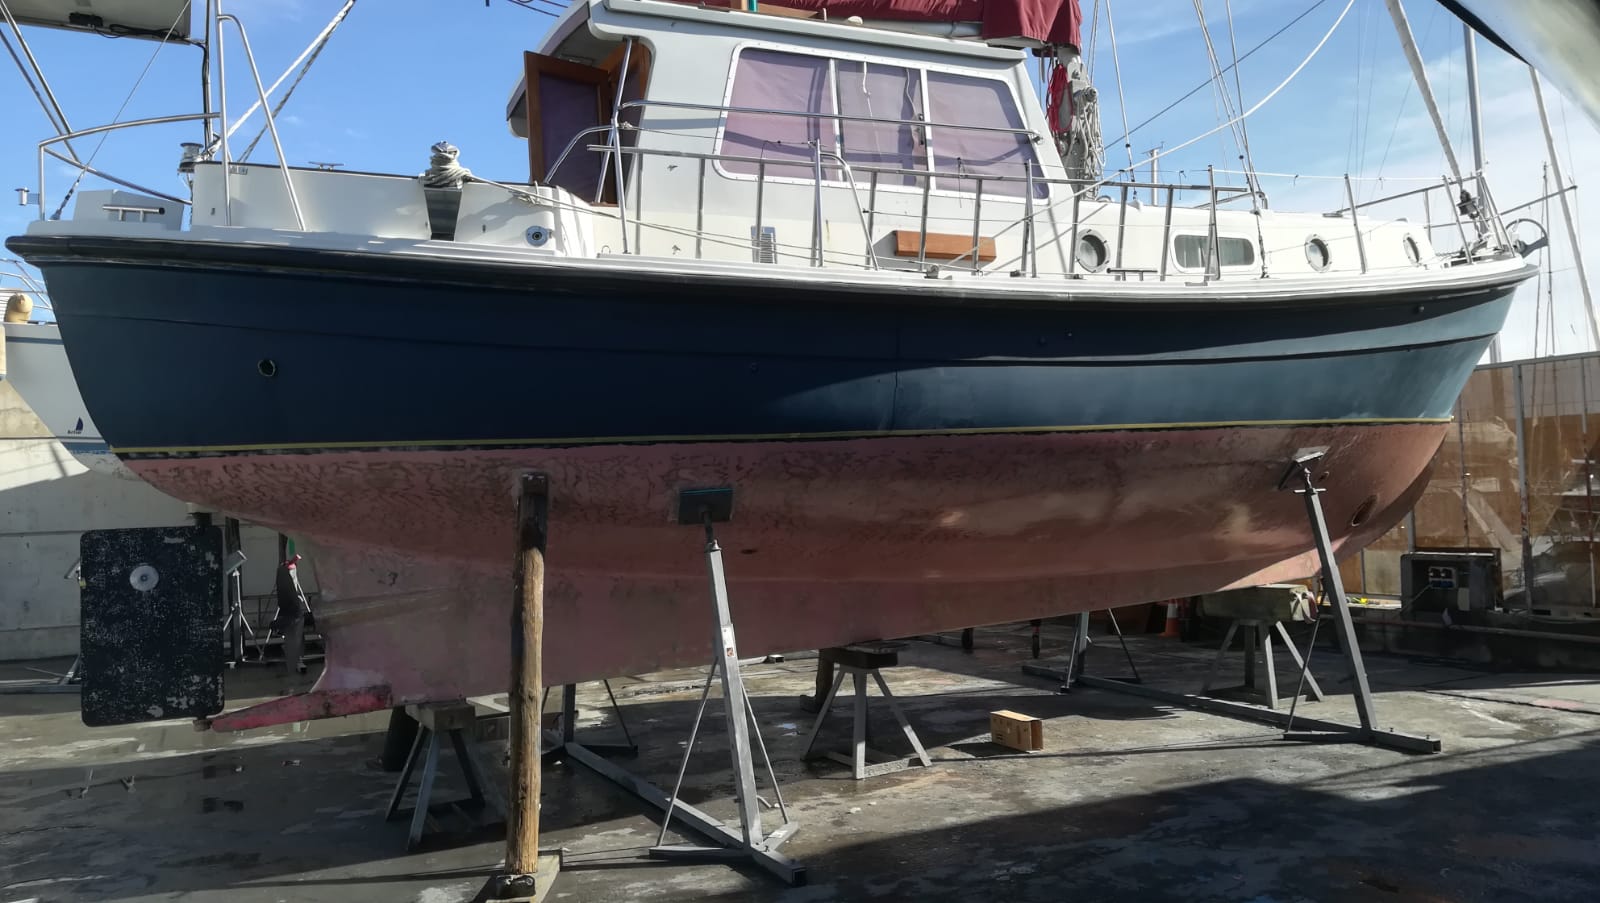
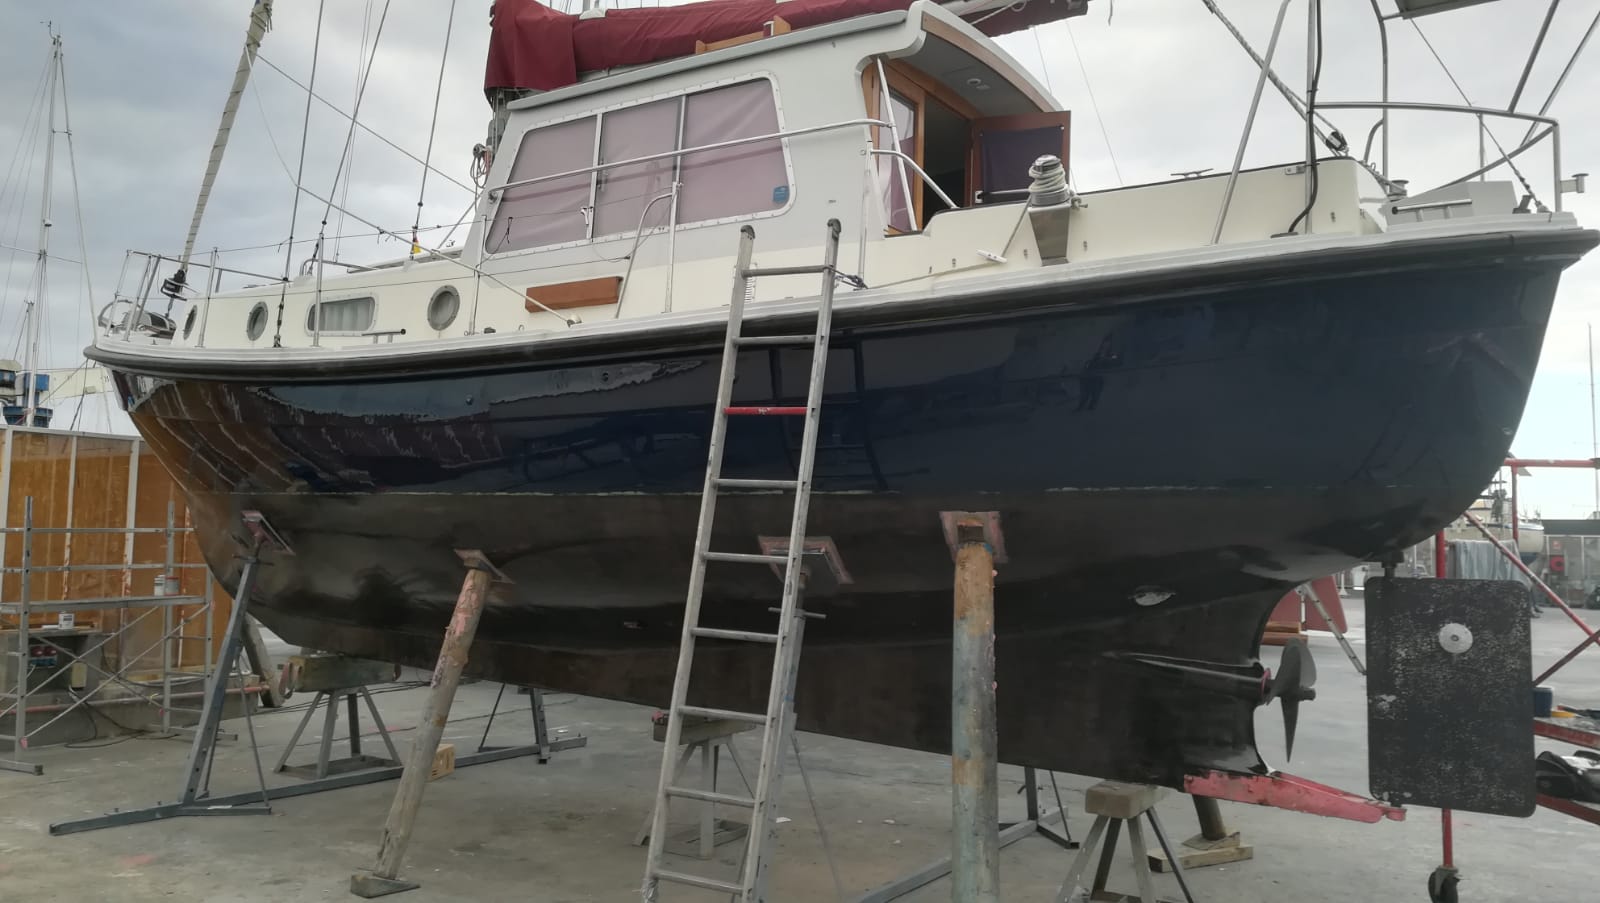
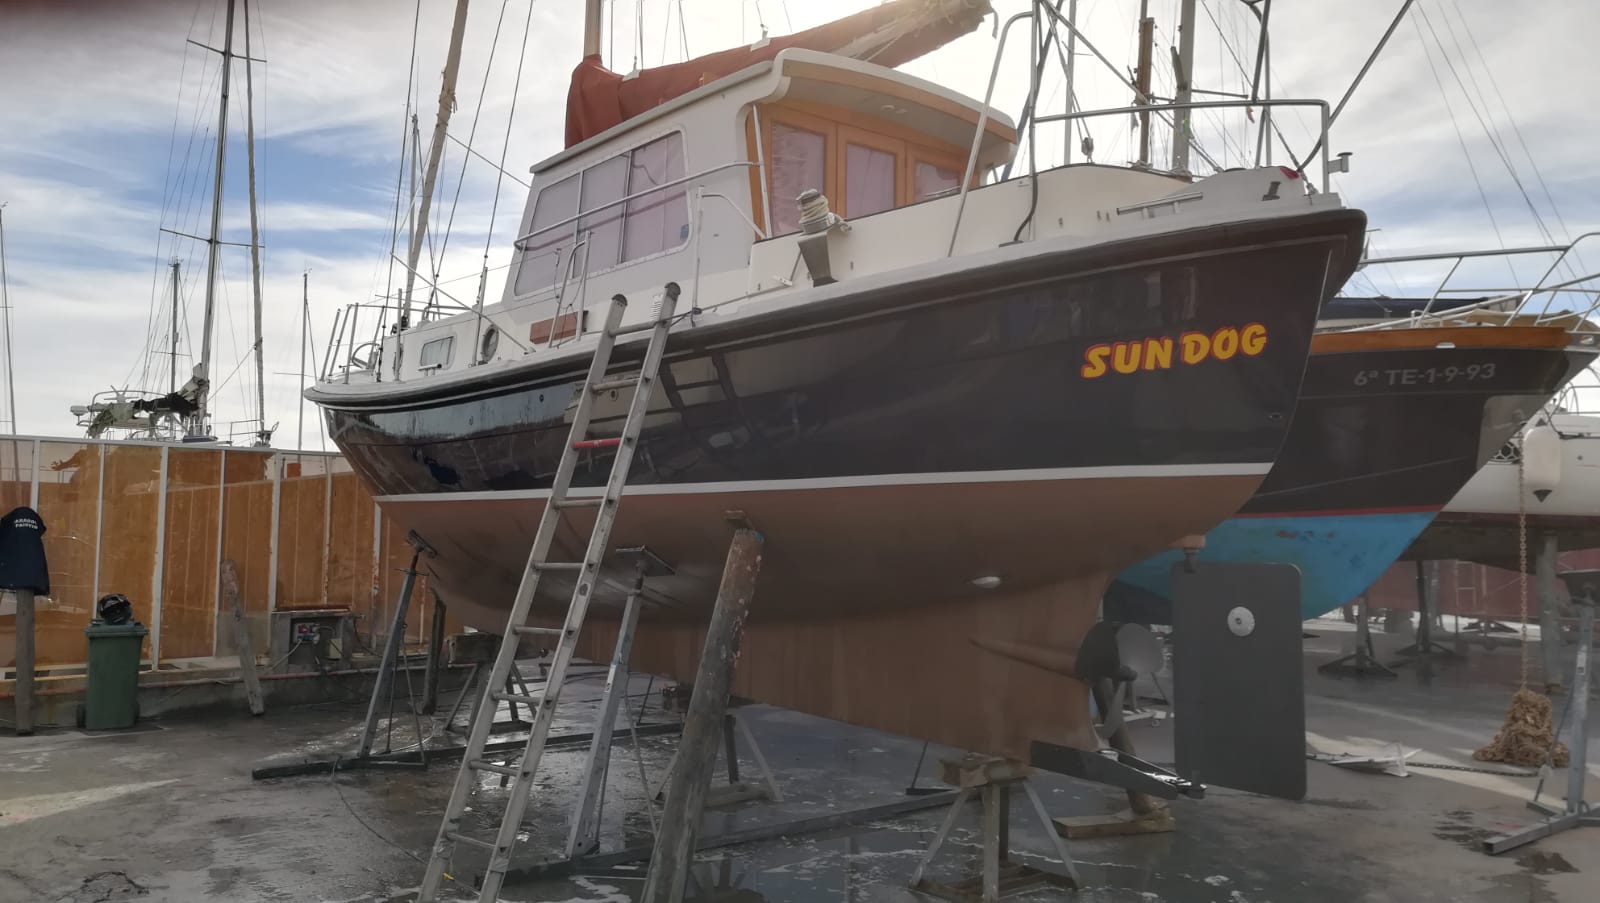
Sun Dog on the hard 2007 prior to purchase
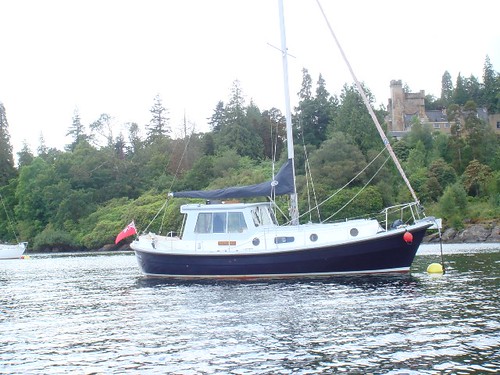
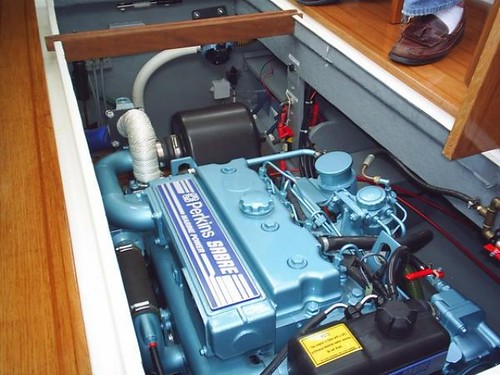
Apart from the double ended “old lifeboat hull shape” which I fell in love with, other factors that swayed me included the fact that she had been totally and professionaly refurbished/rewired in 2004/2005 to a very high standard, and she also had a brand new Perkins 92hp engine installed at the same time – no shortage of torque with this amount of power and large 3 bladed prop!
Hull Number 40.
As at time of purchase in 2007:
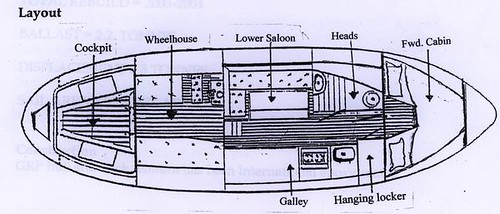
The following has been copied from the brokers (Peters Opal) literature, with subsequent annual upgrading work listed at the foot of the page.
Dimensions
LOA: 34′ Beam: 11′ 4″ Draft: 4′ 0″
Engine(s): Perkins Engine(s) HP: 92 Cruising Speed: 6.0
Max Speed: 8.0
ELECTRICAL
Battery charger
Electrics – Totally professionally rewired in 2004
Solar panels
Shore power
2 x fuel tanks
Bow thruster & engine fitted in 2004
New R&D coupling & 45mm stainless prop shaft fitted 2004
New stern bearing fitted & stuffing box repacked in 2005
Engine room gutted and repainted 2004
NAVIGATION
GPS
Chart plotter – Raymarine 530 & secondary “back-up” plotter
Auto pilot – Raymarine 300 & remote control
Echo sounder
Wind speed
VHF radio
Compass
Clock
Nav lights
All instruments new 2004/5
DECK
Anchors, 35lb CQR & 64m heavy chain, 20lb Danforth kedge with chain & 60m warp
Winches 6 – Lewmar mainsheet winch new 2004 & Lewmar reef winch new 2004
Extra cleats 6 x custom stainless steel cleats new 2004
PushPitPulPit – Pulpit & lifelines new 2004
tanchions guardwires
Boarding ladder
Hatches
Opening ports
Cockpit table
Warps fenders
Windscreen wipers – 2 x Pantograph wipers new 2004
Cockpit locker
Wheel steering in wheel house
Tiller steering in cockpit
Self contained gas locker
Stainless steel mushroom vents new 2005
Teak handrails on wheel house & coachroof
Saloon fixed windows replaced
Skylights to wheelhouse new 2004
CANVAS
Cockpit cover – Dark blue new in 2004
Sail cover – Dark blue new 2004
SAFETY
Lifebuoys
Bilge pumps
Fire extinguishers
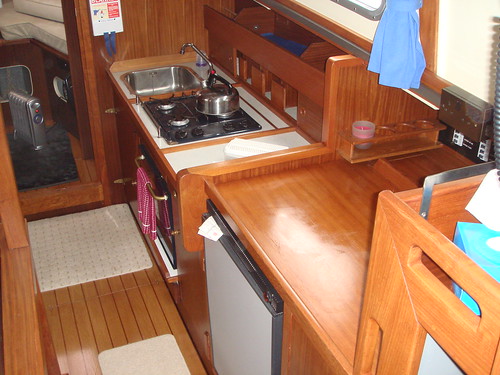
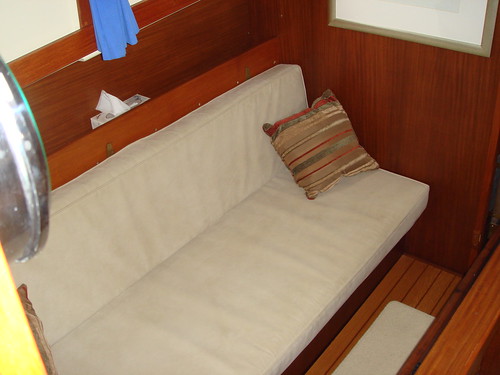
INTERIOR/DOMESTIC
4 X Berths
2 X Cabins
Teak & holly flooring
Interior joinery in teak & Afromosa
Alcantara cloth covered upholstery new 2004
Curtains
Stereo
Chart table
Saloon table
Hanging locker
Wet locker
Heating – Force 10 Cozy Cabin gas heater fitted 2004
Shower tray fitted
Wash basin
Cooker
Oven
Refrigerator
Hot & cold pressurised water system
Water heated via calorifier & immersion fitted 2005
Water tank capacity (500 litres)
2008: Upgrade work
New wind instrumentation on masthead along with a new Raymarine 60 series wind instrument fitted to replace the old unit.
New VHF/DSC Radio fitted in wheelhouse.
New float switch fitted to activate automatic bilge pump.
Main compass reset by Thomas Gunn.
2009: Upgrade work
New tan mainsail (Owen Sails)
New tan stackpack (Owen Sails)
Cage built over gas heater vent to prevent genoa sheets fouling.
All winches including mast winches replaced with new Lewmar self tailers apart from the mainsheet winch.
New stainless steel grab rails manufactured for the sides of the wheelhouse.
New teak block made for under the mast and also for the reefing winch.(what a job finding solid Burmese teak!)
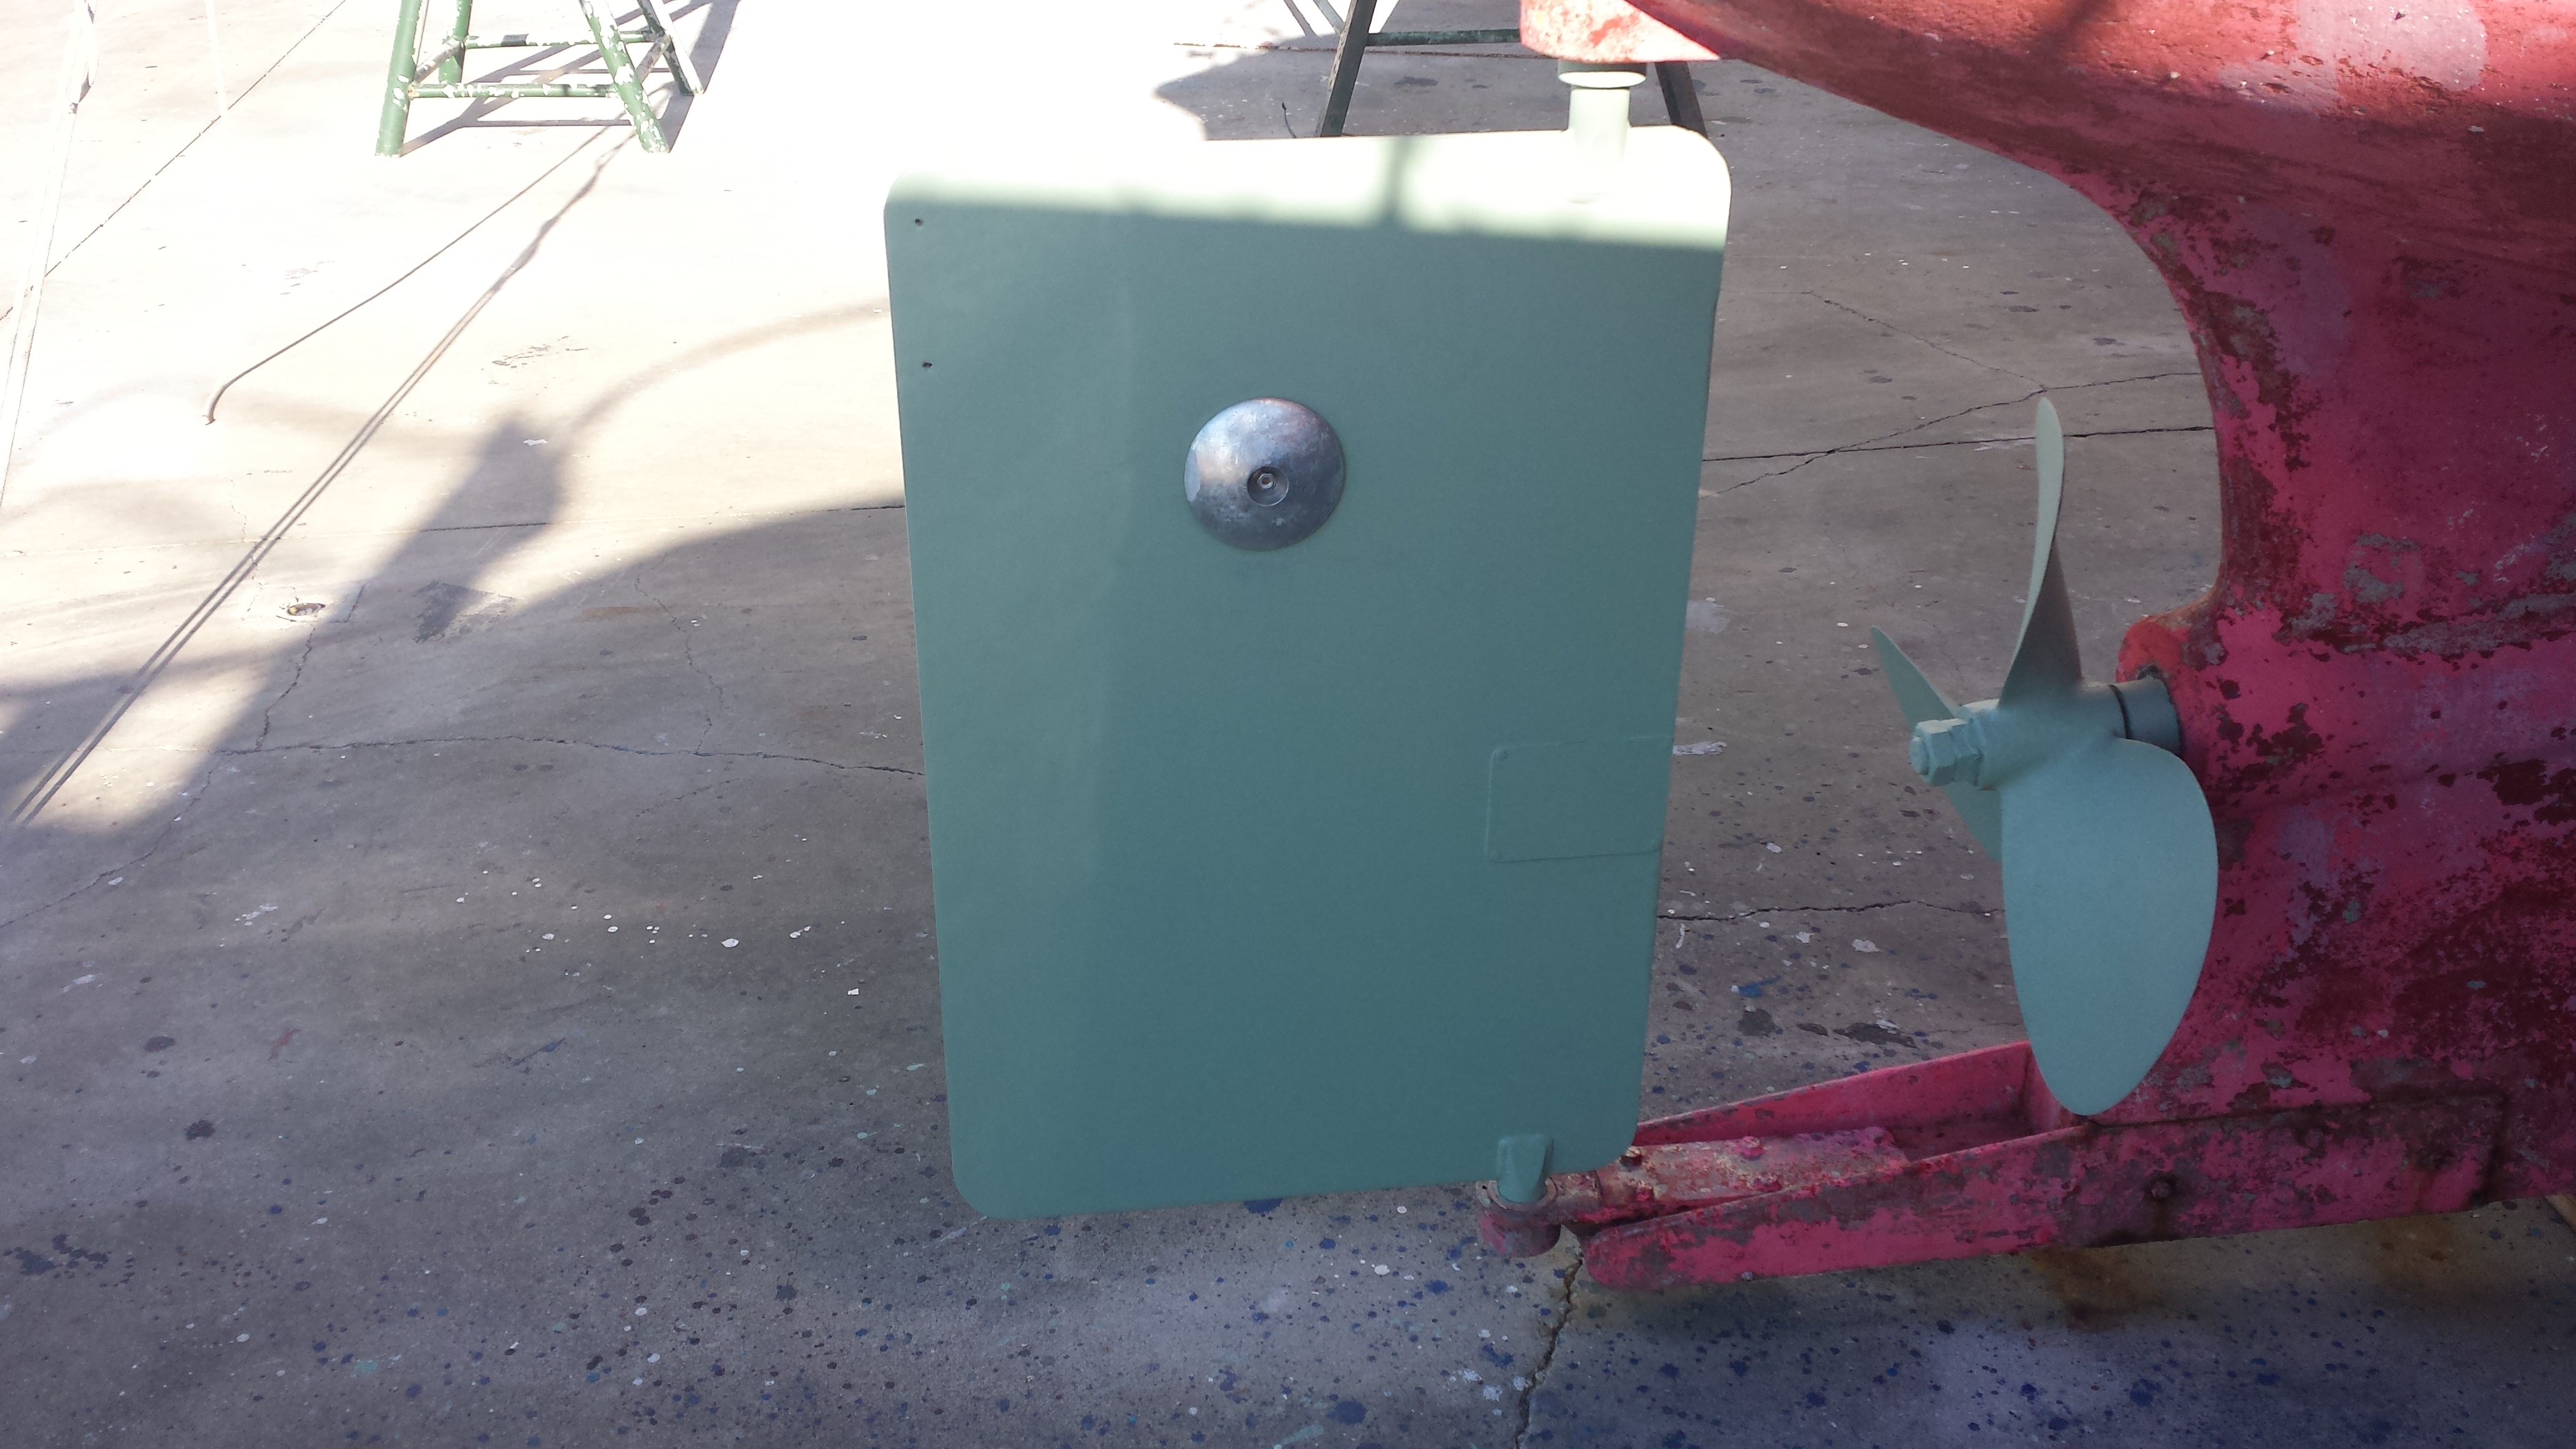
Underside cleaned and anti-fouled with new main anode plus bow thruster anodes replaced.
Renewed the top guardwire on both sides.
New bilge pump.
Prop cleaned and polished.
Brightwork varnished.
2010 Upgrade Work
New Garmin HD Radar on Scanstrut gimballed frame.
New Garmin 4012 Chartplotter.
New Garmin AIS600 fitted.
New Echomax active radar fitted.
Raymarine 530 moved down below.
New (small) Invertor for laptop.
New flexy white/red light fitted at chart table.
New combined tricolour & anchor light.
New combined steaming & deck flood light.
Swan neck fitted and old deck connections removed – all cable connections are now internal.
New reefing arrangement and clutches fitted to mast and boom.
New stainless steel grab rails on doors.
Cleverly designed (not by me!) and constructed chart storage unit built into the boat.
2011 Upgrade Work
New speedlog fitted – Raymarine
New (neat/clever) fitting inside gas locker to securely store outboard in an upright position – no more leaking from outboard!
New lockable gas locker lid manufactured to suit above modification.
New multi stage battery charger fitted.
New galvanic isolater fitted.
All seacocks serviced + anodes replaced.
New ss tiller bracket + tiller manufactured – can now sail from cockpit.
Stern gland cleaned out completely and repacked.
New electric anchor windlass fitted – Lofrans Tigres.
New chain counter/control fitted in wheelhouse + remote control.
90 Ltr Bespoke Tek Tanks Holding Tank fitted
New Eberspacher heater fitted.
New Rocna Anchor purchased.
2012 Upgrade Work
New engine start battery.
New 316 stainless steel bow roller manufactured and fitted (to accomodate the Rocna Anchor)
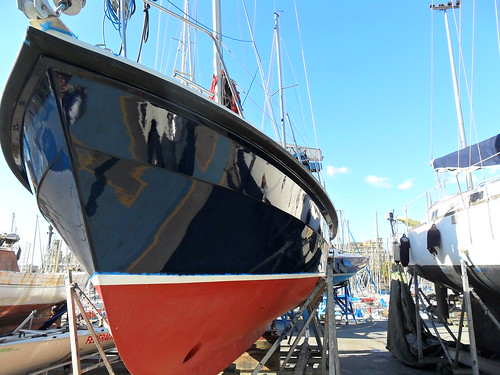
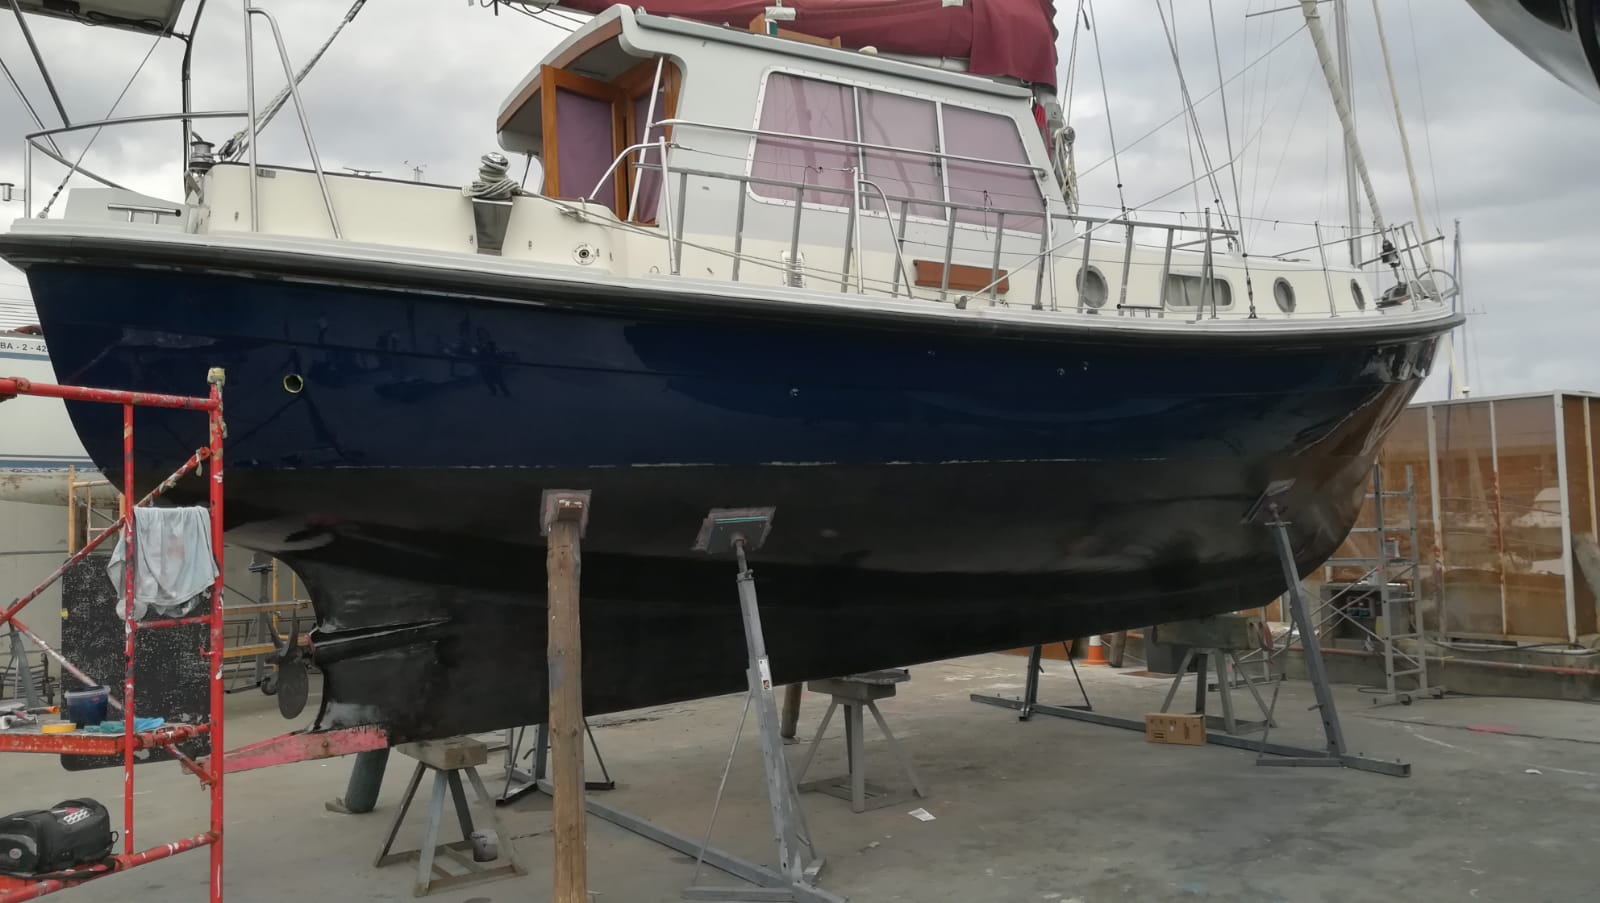
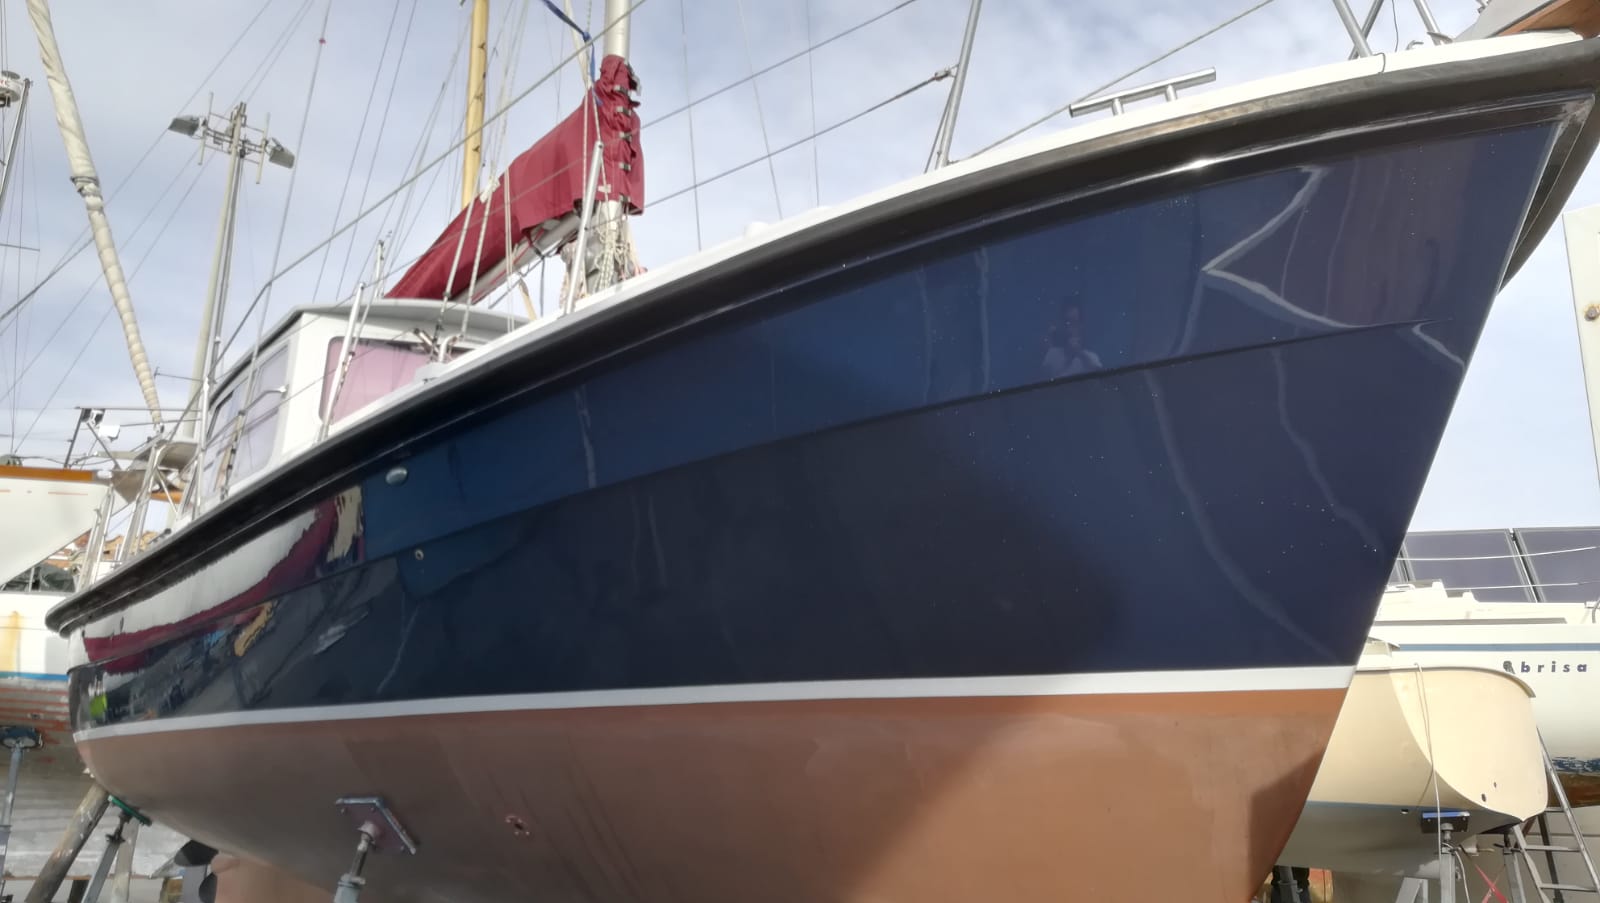
2012 Complete Boat Painted.
Topsides and Hull Painted in Awlgrip. Products as below.
Awlgrip Oyster White
Awlgrip H1313 Seattle Grey
Awlgrip Flag Blue
Loctite 34986 – Wheelhouse roof base.
Prop: Marlin Primer + Velox Plus
Wheelhouse doors stripped back to bare wood and varnished both sides. Other brightwork stripped and varnished.
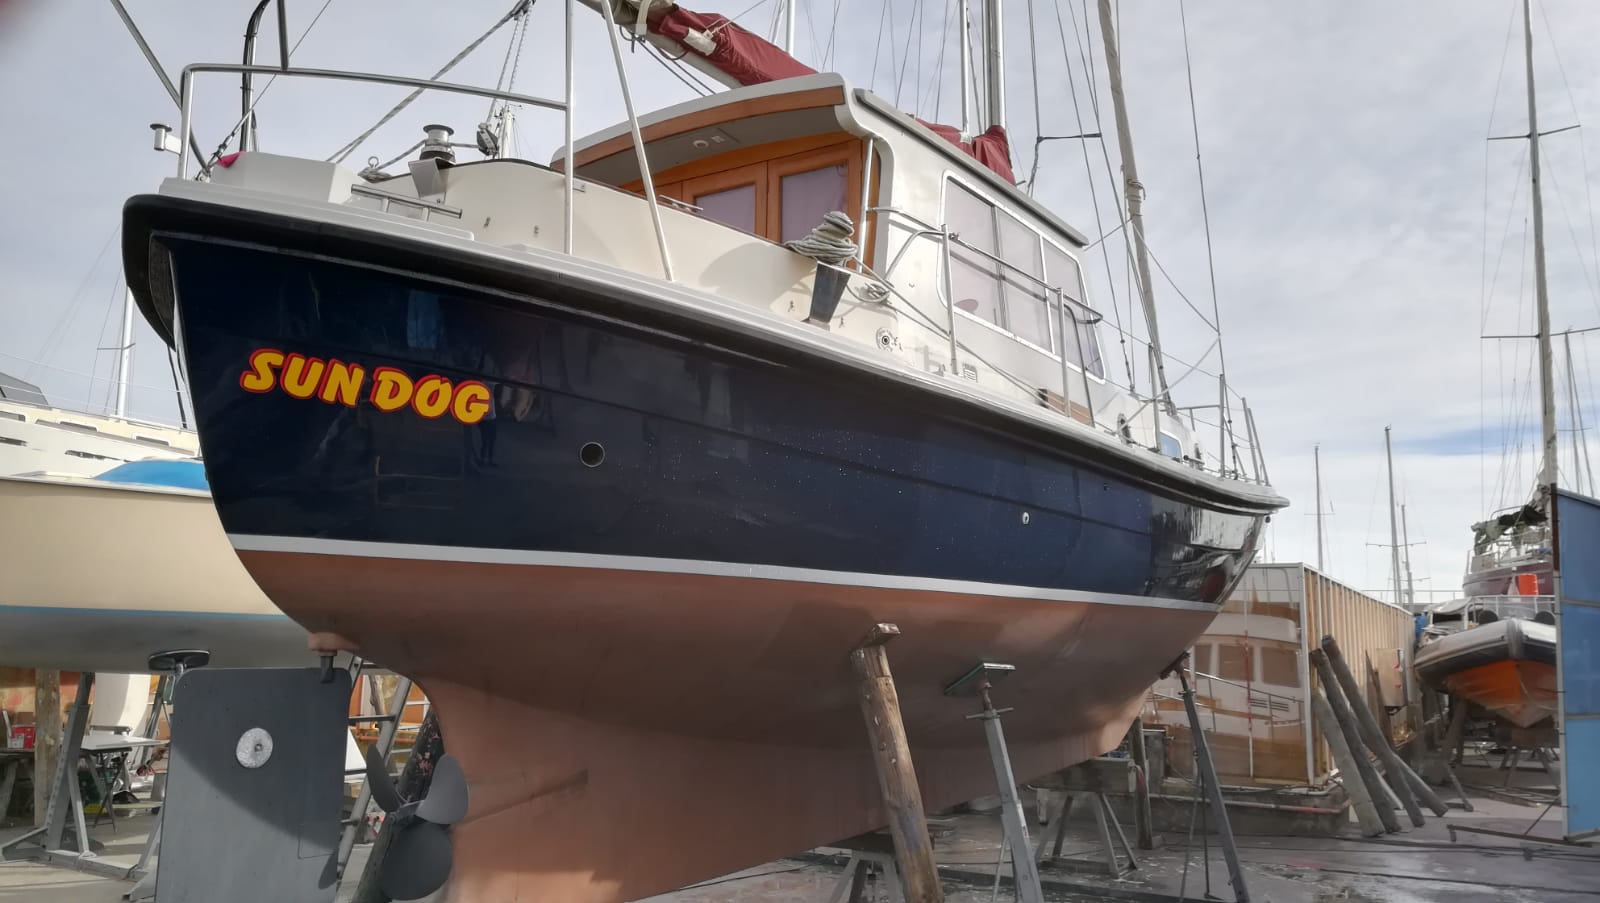
Sara and I are absolutely delighted with the final results of the boat prepared and painted by Paradocks Painting in Barcelona. (Contact number for Peter is 0034 677 216783)
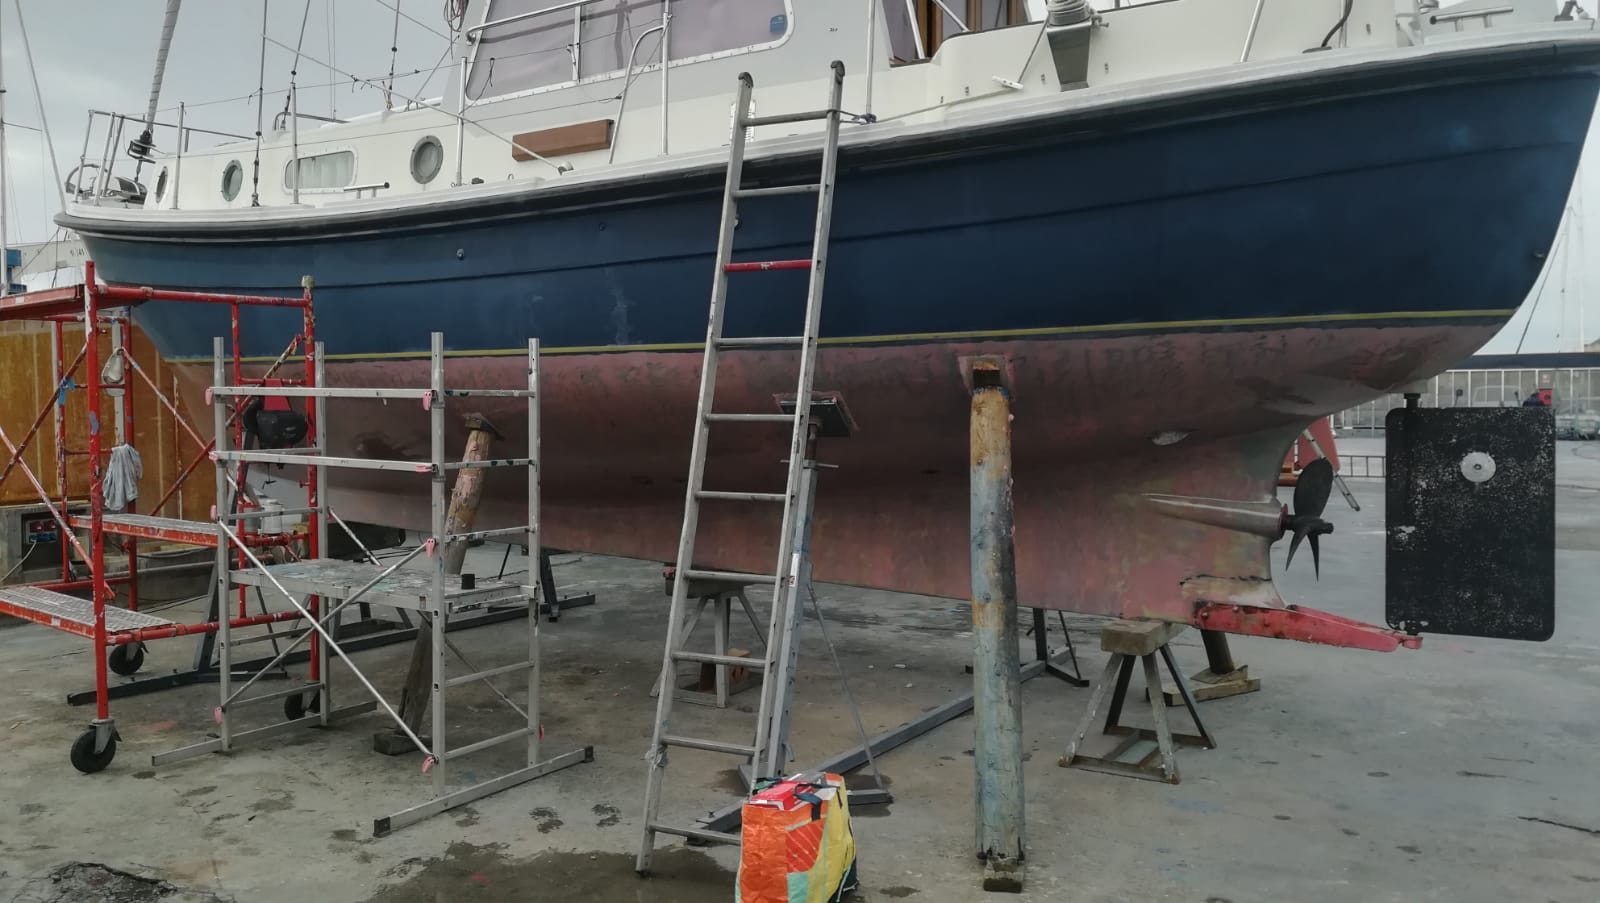
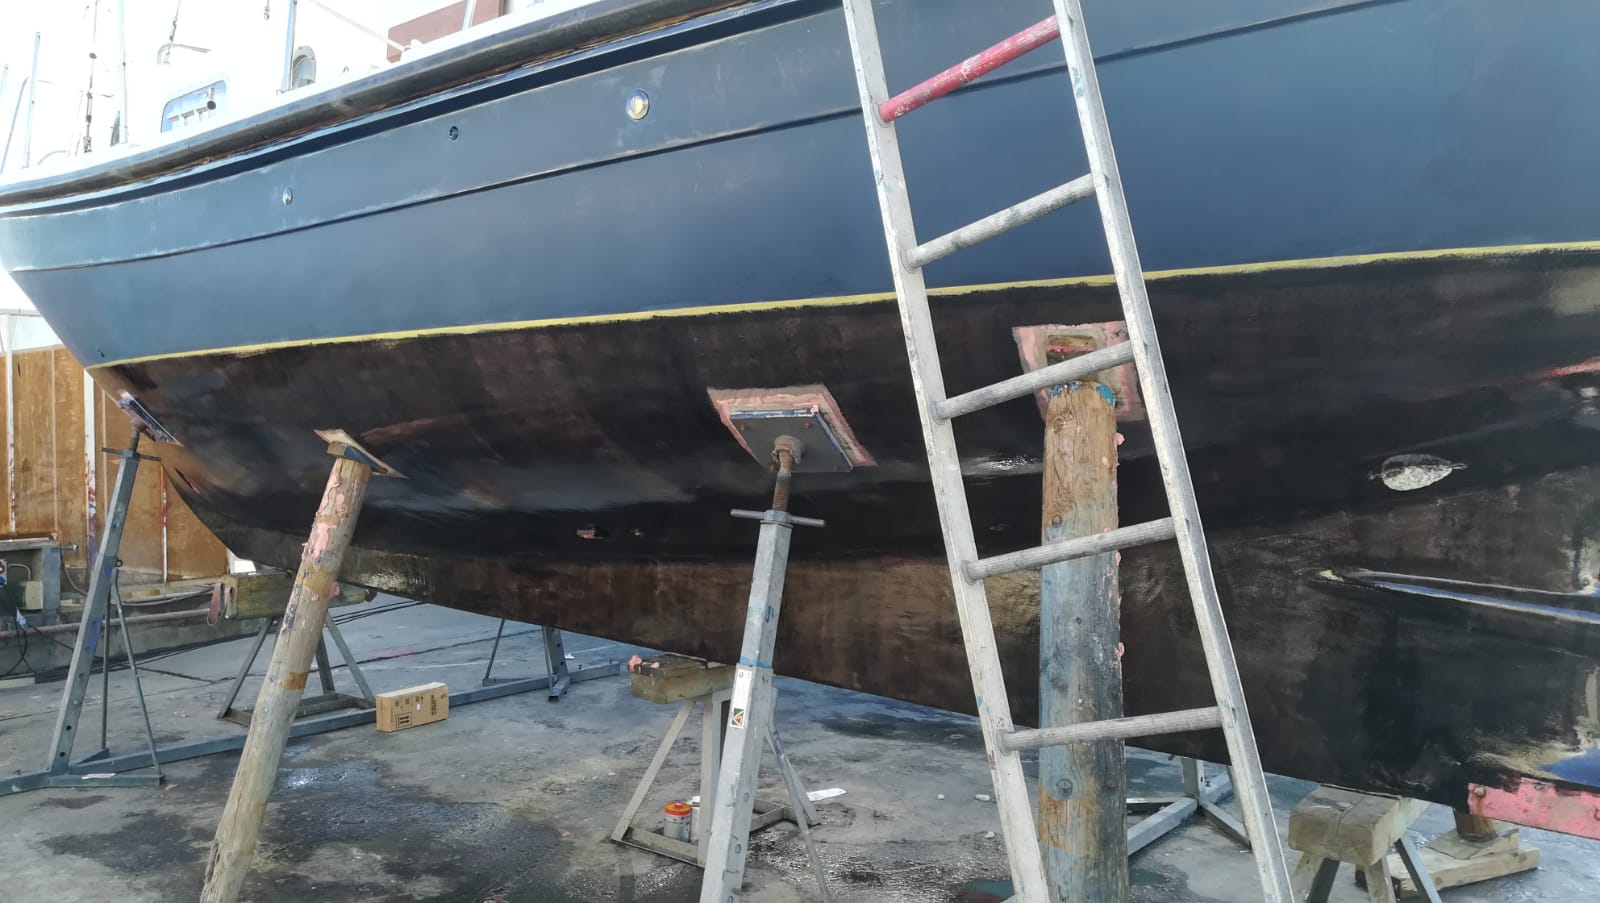
Here are a few shots of the hull being prepared before being painted with Awlgrip Flag Blue, this being the closest match to the original colour.
Hull primed and filled – you can see Peter’s attention to detail in the preparation

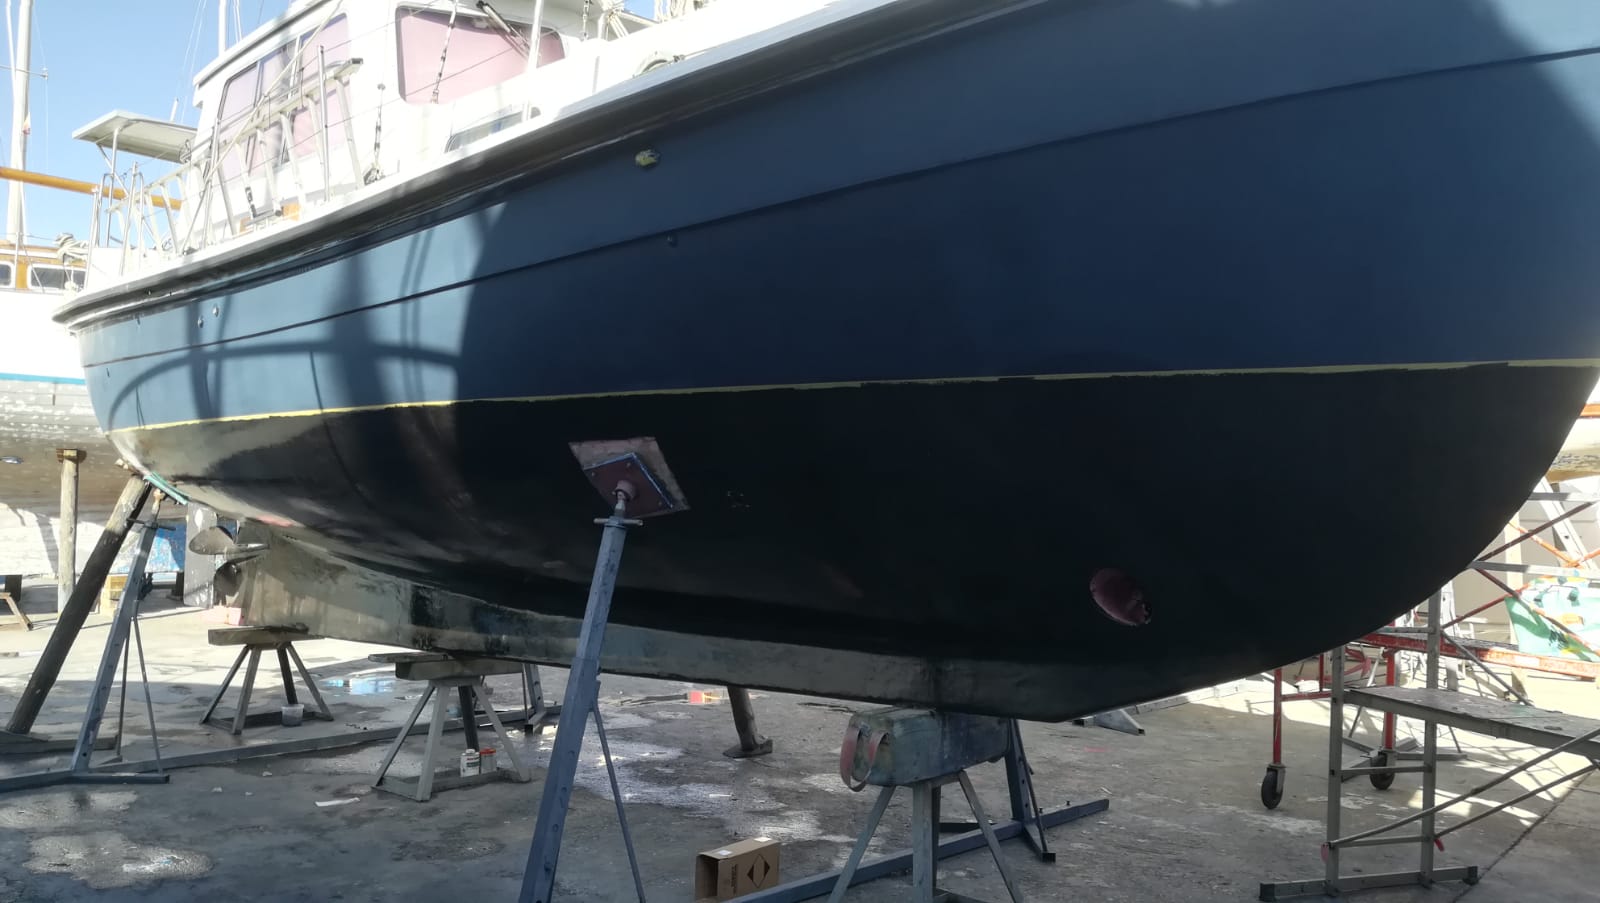
Hull finished – what a difference – only the masking tape to come off!!
Hull names were via Funky Monkey Boat Names – excellent service.

Topsides and superstructure were fully prepared, then painted with Awlgrip Seattle Grey and Awlgrip Oyster White (some of the masking tape had still to be removed when these shots were taken)
The wheelhouse roof was sanded back prepared then coated with Loctite 34986 before being given a few coats of non slip deck paint.


With the extensive professional refurb in 2004/2005, followed by our investment in upgrading Sun Dog with new equipment since we bought her in 2007, the painting of the boat was the final piece in the jigsaw. We now not only have a safe and comfortable boat, but now one that looks superb and will do so for many years to come. The investment in having her repainted using Awlgrip is worth it, because Sun Dog is a unique, rugged, and tough boat that really would be hard to replace. I could be tempted by an Amel Maramu, Hans Christian 41t, or a Baba 40 but don’t tell Sara I said that!!
2013 Ultra sonic Anti-Fouling Fitted – see under “categories” in the home page for details and photo’s.
2014
January: Out of the water survey conducted to satisfy insurance company. Results were extremely reassuring and the surveyor was complimentary about Sun Dog 🙂 One small bit of fibre glassing required at next lift out. All in all very pleasing.
February: Fitted two new 170ah domestic batteries.(Varta M8 Promotive)
May: New chain from autopilot to main steering cog. New drive belt fitted, Changed Gearbox Oil, New stainless steel frame fitted to stern. New fluorescent light fittings throughout the boat.
2015
January: Took the opportunity with the boat out on the hard to cut out and re-fibreglass the tabbing inside the hanging locker as the survey in 2014 highlighted this small rectification. Might sound technical but basically fibre glassing the locker bulkhead to the coach roof of the boat. It never ceases to amaze me how much stripping out is required to get to the bit on a boat that needs work. Takes longer to strip out and replace than doing the actual job!!
May: It has taken a bit of time but we have now managed to secure Sun Dog to a couple of large concrete blocks on the seabed in the bay of Puerto Pollensa. This has been a palaver (too long a story) and necessitated a diver at various times until I was happy with new heavy chain laid between the blocks and new strops made up and connected between the chain and the boat. I’m now happy that she is secure on the swinging mooring.
June: As Sun Dog is now on a swinging mooring in Puerto Pollensa, we needed a bit more power out of the existing solar panels to run the ultrasonic anti fouling system without risking the batteries running down. Therefore we adapted the current stainless steel frame and fitted a 250w solar panel. This panel is keeping the batteries at 100%, even with the ultra sonic anti-fouling running 24/7…..good result.
2016
Apart from ongoing maintenance, we managed to take off all the wheelhouse doors, and stripped them completely of varnish. They have now been coated with numerous coats of Danish Oil. This I feel is a much better option and keeps the wood “nourished”. We done the same with the lightboxes and engine vents. This also makes it easy to give a quick coat of Danish Oil to brighten things up – as opposed to striping back varnish to bare wood annually/bi annually – and one would be had pushed to tell the difference.
2017
Sundog has always had two solar panels on the wheelhouse roof and also the large solar panel fitted on a stainless steel frame. To suit the battery monitor that was fitted I now have the large solar panel purely providing energy via a regulator for domestic batteries. With the two solar panels on the roof providing energy via a regulator for the smaller engine battery. This two separate charging systems affords a bit more redundancy/security with battery power. All three batteries were also renewed this year.
Until doing this work I was a bit puzzled at having to change the batteries after only 3/4 years. The culprit was the solar panels on the roof being incorrectly fitted. They were not run through a regulator nor were they fused – in other words there was nothing to stop them overcharging the batteries!
I had always assumed there was a regulator fitted under the roof lining, but decided to strip it all out this time while ashore and check the complete wiring system for these panels…..really pleased I did.
All the woodwork was lightly sanded and around five coats of Danish Oil applied.
2018
January
Getting the boat ready has included re-varnishing the chart table and also the shelf which holds the chartplotter, looks much better.
Previously I have used Velox antifouling only on the propeller, but this time I have taken the stainless steel rudder back to bare metal, and have applied a couple of coats of primer and three coats of Velux antifouling.
I also fitted a really neat LED light in the wheelhouse roof. When it is first switched on it illuminates red LED light, and when switched off and then back on again it illuminates with white light. This means that if I want, I can keep the red LED’s on in the wheelhouse while doing night crossings without losing night vision.
All the Blakes seacocks were stipped down, re bedded with grinding paste, cleaned off and then finally re-greased with Blakes grease. I also too the opportunity to fit longer phosphor bronze screws which allowed me to use phosphor bronze nuts on the back of the screws that join the two pieces together. I’ve never really been 100% comfortable with the original design of the screw simply going into a captive thread, but there again, as far as i know there has never been a problem since the original design (circa 1930’s) with the two parts coming apart due to the screw loosening. Can’t help the way my brain works though, and I’m now much happier in my mind 🙂
March
Boat back in the water, with, in addition to the above:
New Raymarine VHF/DSC fitted.
Stainless steel frame modified and strenghtened.
New impeller fitted.
Engine oil changed.
New oil filter
Gearbox oil changed.
New fuel filters.
Coolant changed (Havoline XLC 17.5ltrs)
New fresh water pump fitted.
New Perkins exhaust elbow fitted.
New 1-2-Both switch fitted. (Due to my clumsiness with a floorboard!)
New fresh water filter fitted.
May
When we bought Sundog we knew there was a bit of moisture in the hull, but its never really been a concern.
However with the implications of Brexit, we might need to either re-register as say a Belgium boat to keep the boat in EU waters, or perhaps we might need to her sail back to the UK.
This focussed our mind on getting the underside stripped/dried out whilst we have the chance to do this under a hot sun. Let’s be honest – there is precious little chance of doing that in Scotland 🙂
To this end we had our friend Pete from Paradocks Painting fly out to Mallorca to check the hull. He felt, that as there was no real blistering (odd one or two visible) and no signs of any delamination that there was an argument for not bothering.
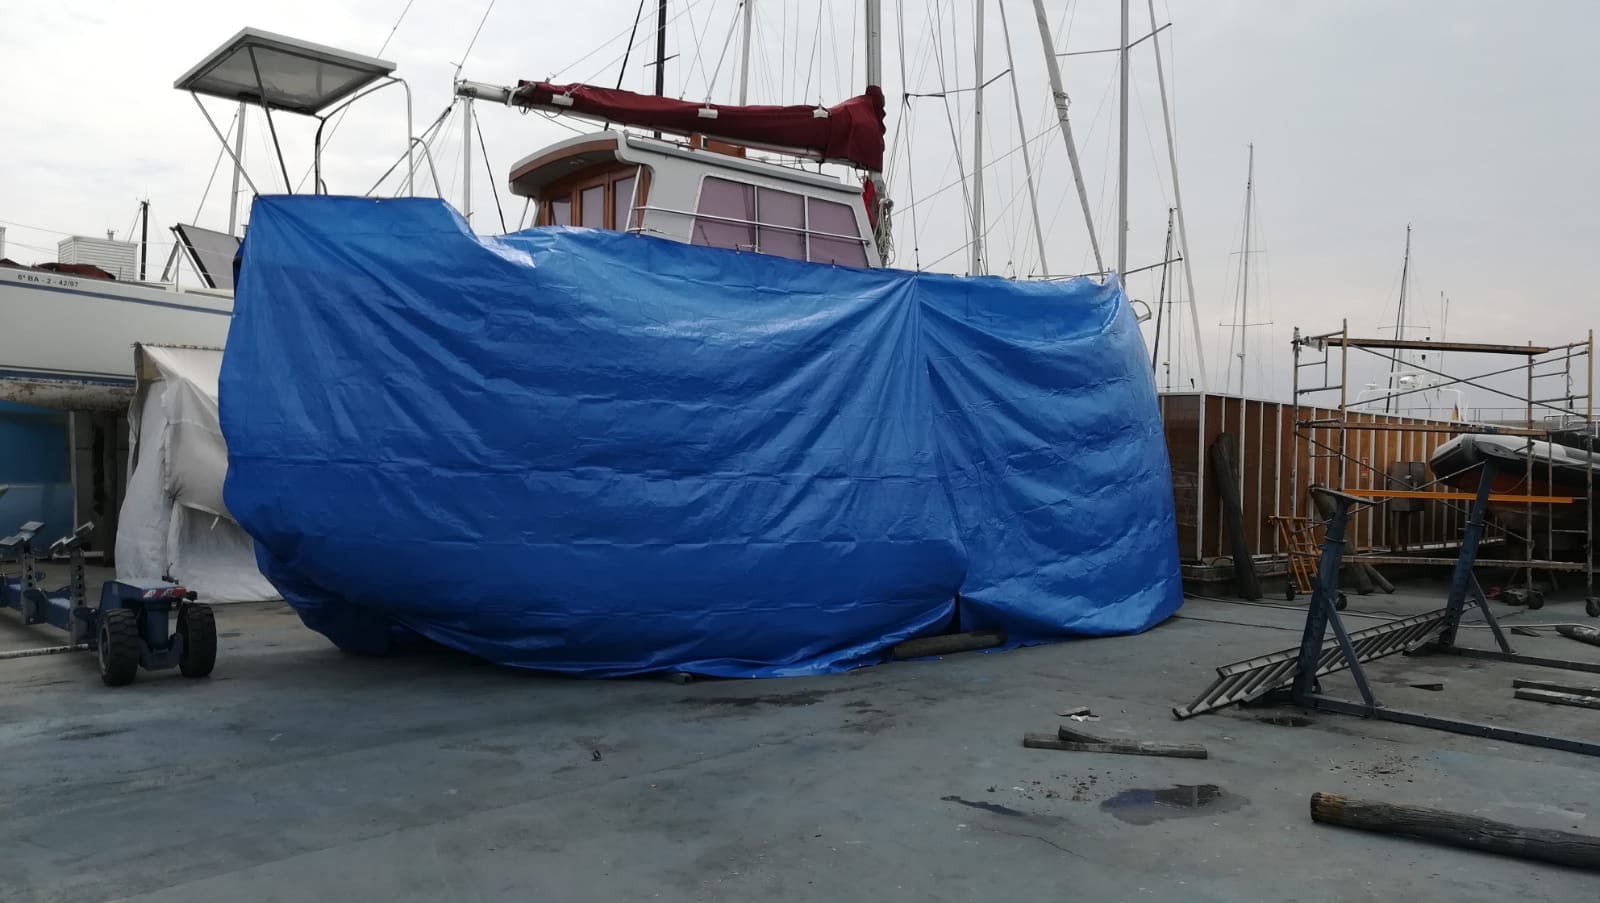
However after much discussion Sara and I decided to just get it done this summer, with our preference being Pete to do the work. He arranged the lift out at Port Olimpic in Barcelona and we sailed Sundog over at the end of May for the work to start. It means us sacrificing this summer, but the heat during the months of June, July, August and maybe September will allow her to dry out naturally. Once dry any imperfections will then be filled, the underside will have a few coats of epoxy, and finally four coats of coppercoat will applied. Bit more expensive, but heigh ho, I like things done properly. I believe coppercoat on the underside along with the ultrasonic anti fouling will be a good combination.
Here is Sundog the morning after we arrived, lifted out, sheeted off, and ready for the work on the underside to get fully underway.
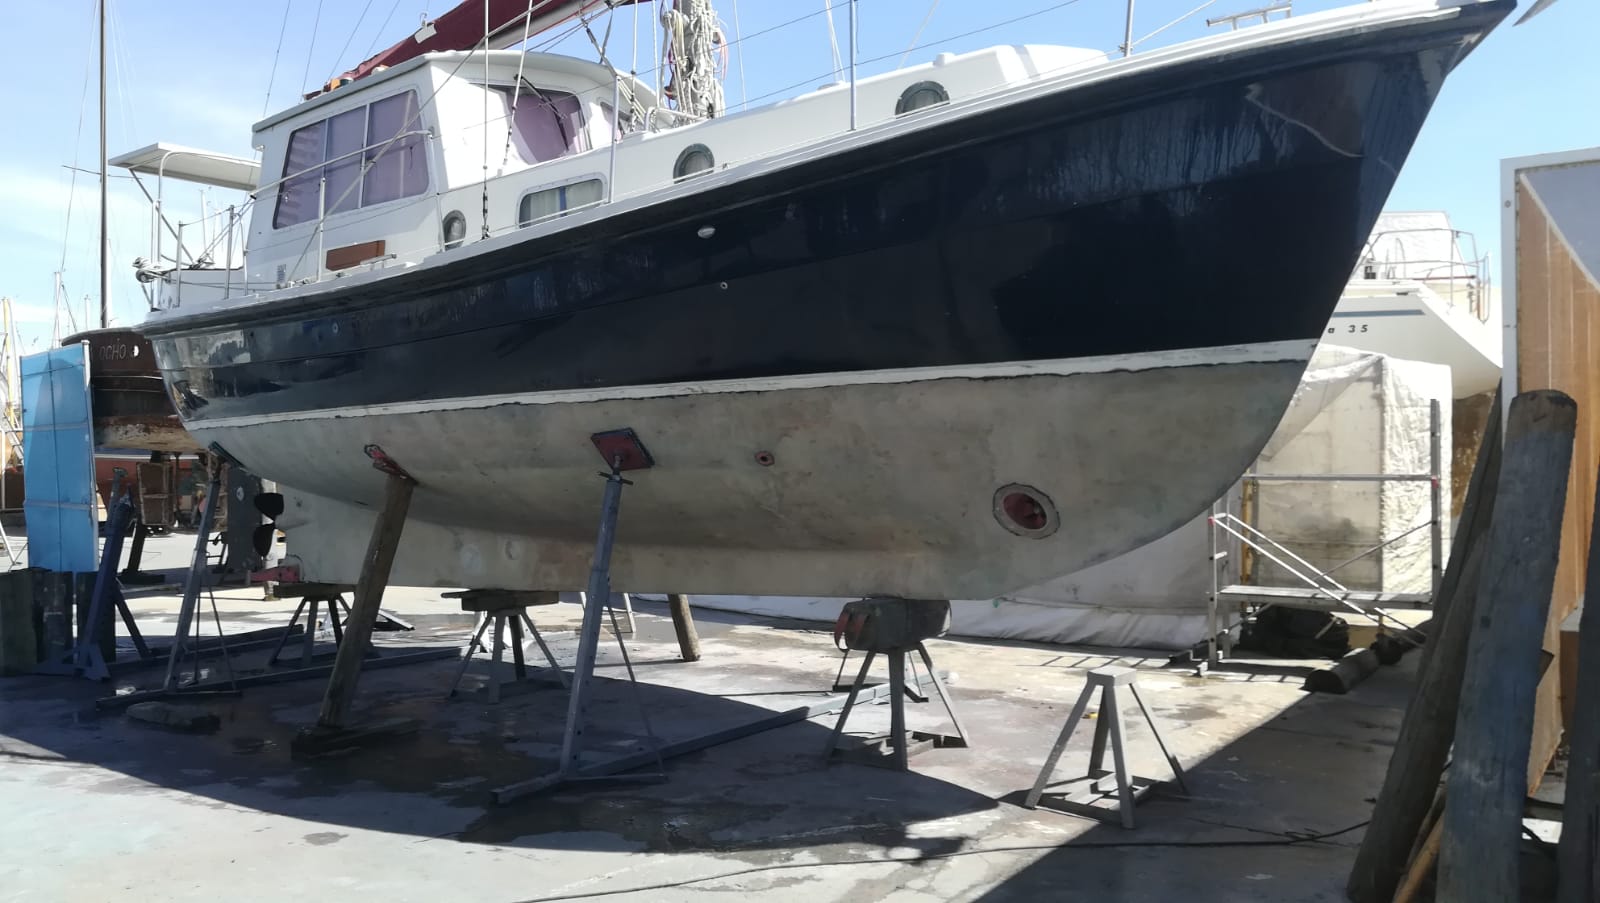
Underside Stripped
Well I am pleased to say that Pete has finished stripping the underside of Sundog and there have been no horrible surprises. In other words the fibreglass is solid with absolutely no voids nor delamination. In the words of Pete…….. ” this boat is built like a brick s***house”……..whatever than means 🙂
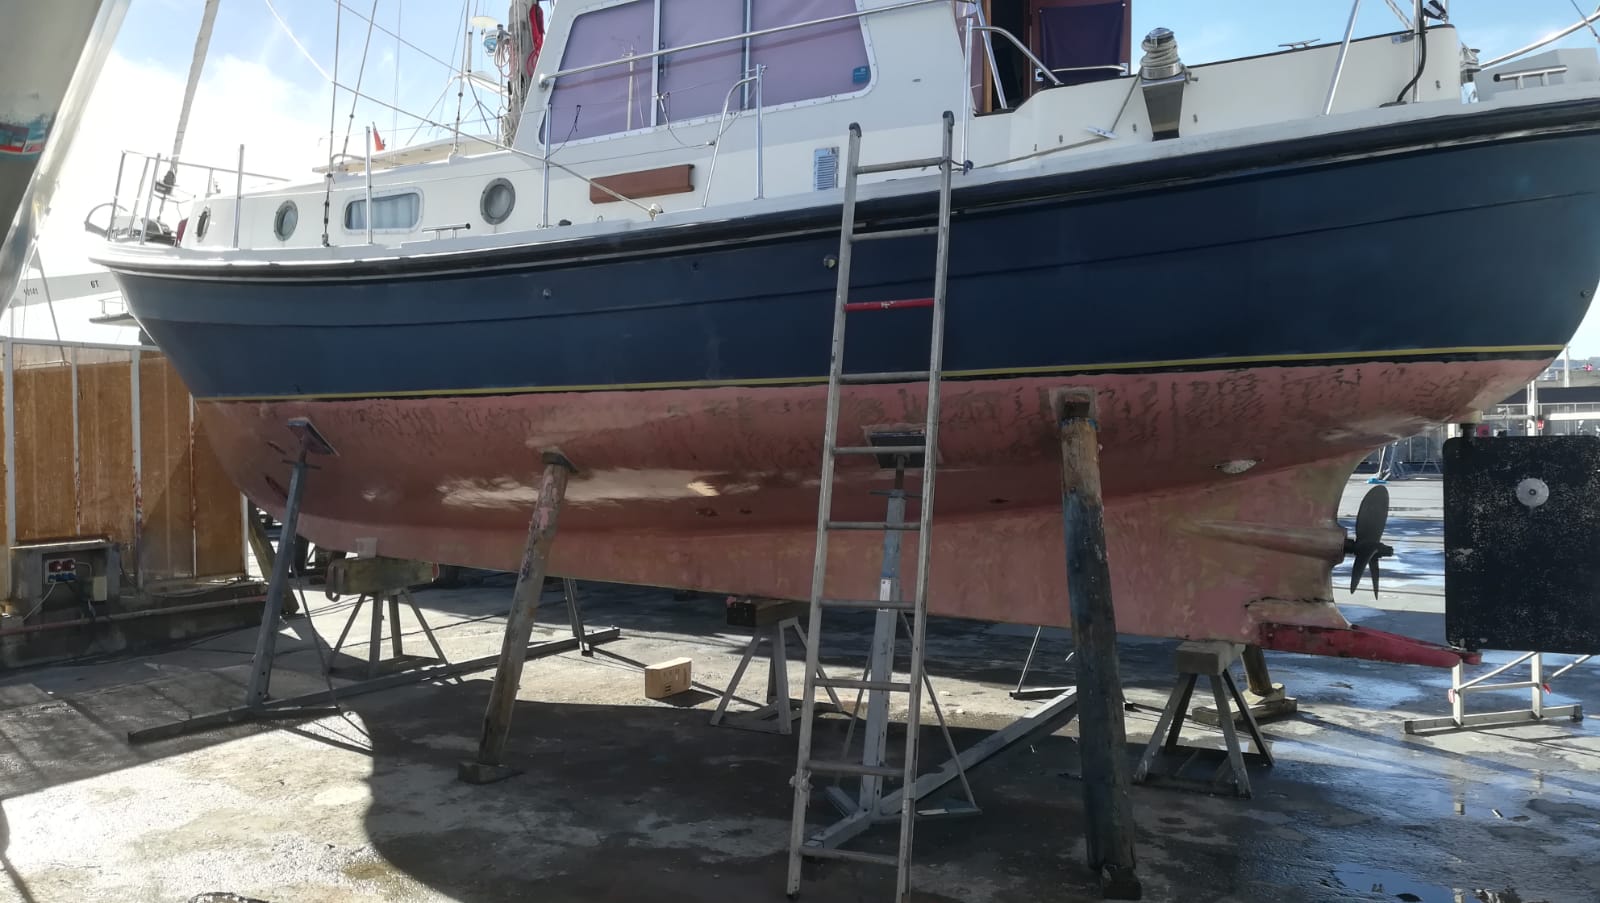
Epoxy Coatings
Since the hull was peeled back in June, the drying out has gone really well, so well in fact that we decided to start the filling and fairing process last week.
This was followed by subsequent coats of epoxy. You can obviously see the filled and faired hull through the first coat of epoxy.
The first coat of epoxy left a shiny reflective surface, so we decided that we would add a bit of colouring to subsequent coats to ensure we never missed any part of the hull.
First Coat
Second Coat

Third Coat
Final Coat + Hull
All this is in preparation for the application of Coppercoat, as in our opinion there is no point in stripping the hull filling, fairing and coating in epoxy, only to apply normal antifouling. It just seems sensible finish the job properly and spend the extra on Coppercoat.
Finished Job
To say i am pleased with the finished job is a bit of an understatement. The underside work has been substantial & the hull repaint is superb. Huge thank you to Pete from Paradocks Painting (check them out on Facebook) for once again doing such a super job on Sundog. This work should see her through for another few decades 🙂 You can see all the stages of work before the application of the copper coat in previous posts.
Here she is from the bow;
Starboard side;
Port side;
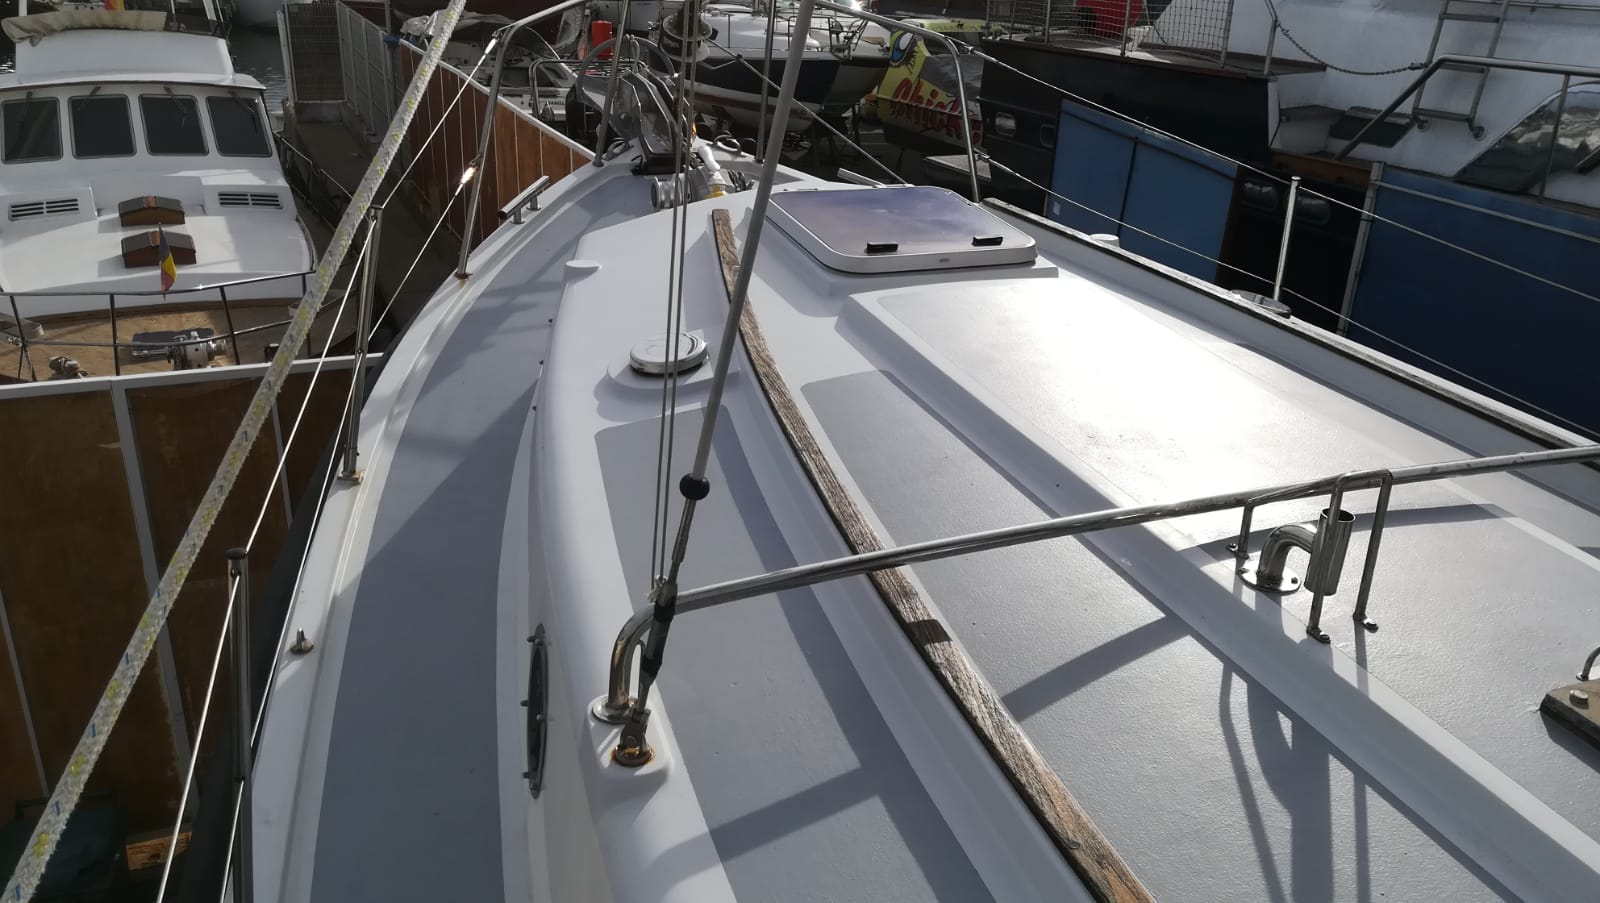
Coach roof and side decks;
With all the work on the underside, and the painting of the hull, there seemed no point in missing out the side decks and coach roof.
Thank you so much for sending the details and story of your amasing boat, so very interesting, what a history and website.
John has recently returned from Porto Pollenca but before he left he had a little trip
around the bay and saw your boat, just in passing, and it made a good impression
on him, and now on me also!
If you do decide to find another like minded careful keeper for her, we would be
pleased to visit in the new year.
Best wishes,
John and Susan Surbey.
Hello,
My name is Brendan Mushet, and I live in New Brunswick, Canada. I’ve read some of your blog, and you’re a very good writer! I am interested in a Rogger MK1, and am wondering what the sailing characteristics are. My wife and I both want a bluewater boat, but have conflicting opinions regarding the balance between safety and comfort, and I believe the Rogger may meet both of our needs. I was hoping you would have time to describe how the boat sails without the use of power in different conditions, and what pros and cons the boat has while strictly under sail. All of my experience is with sailboats, and am much happier sailing than motoring. I greatly appreciate your opinion of this boat, as much information online is in Dutch.
Sincerely,
Brendan Mushet
Hello Brendan
Thank you for your kind words about my blog……i prefer to call it my anti-altzheimers tool 🙂
I have a Rogger 35 MK2, which is a little bit of a different layout to the MK1, but as far as I know the hull is the same.
We have had Sundog for 10 years and have loved the comfort and security she offers. Sailing her down from Scotland to the Med we had all sorts of weather, and off the Irish coast, believe it or not I had her surfing a bit down the waves in a F8 – but with no drama – just a big cheesy grin!
Sundog is however, no Ferrari – a bit more like a really good old Land Rover. Safe, secure, and gets you over the rough stuff without getting fazed.
With the shape of the hull being a bit “rounded” its always best to have the mainsail up even when motoring. With regard to the headsail, its tricky to have the sheets run through the tracks to suit both upwind and downwind situations as the stanchions always seem to get in the way. Our way around this is to have the main up and motorsail upwind, and then use both sails downwind. Or if I’m lazy only the headsail.
She needs a bit of breeze to get moving properly – say 15kts of breeze to get 5/6 kts of boatspeed. From there on the stronger the blow the more Sundog is getting fully into her stride.
In the F8 off Ireland we had one reef in the main and the headsail double reefed, and we were achieving 7/8 kts of boatspeed, and never felt anything other than safe and secure.
That being said, to describe a Rogger 35 as a proper Blue Water boat would be a bit of a stretch. A set of double headsails and a pole system, coupled with a good breeze and she would be fine; however in light winds you would not be moving. My belief is the Rogger is really good for sailing up to and including crossings in the hundreds of miles range – but not really suitable for thousands of mile ocean crossings in its standard set up.
Hope this is enough info, but if you need any more I will be happy to try and provide.
Gerry,
Thank you so much for the great details. That was exactly the information I was hoping for, and more. We will keep this in mind when we look at the boat.
Thanks again, keep up the excellent writings, and fair sailing!
Brendan